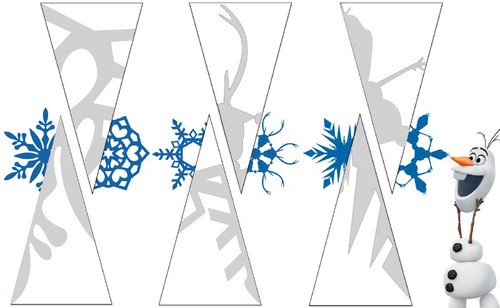
It is impossible to reveal the sacred New Rock without fluffy snow on the streets and beautiful snowballs that fall from the sky. But you can also grow them at your own donkey to decorate the yalinka, vikon. You can make small cuts with your own hands with paper for 10-30 khvilin. Such decor can be attached to the door, hung on the wall. It is possible to grow them with the technique of origami or quilling. Non-zero varieties can include openwork vіzerunki, buti ob'emnymi or add original figurines - spider, snowmen. New recipes can be prepared at once from children. At the designation of the master classes, schemes, templates, the features of folding, visualization of details, gluing of all the elements are gradually examined. Dodatkovo is recommended to take photo lessons and video tips: stench will help you to know, how big it is, curly cuts.
Garni snizhinki from paper - do-it-yourself pidrobki with step-by-step schemes
The original cuts with openwork edges and paper are made with your own hands in the simplest way. The stench is miraculously suitable for decorating the room, decorate the yalinkas. Virobi vіdmіnno go to go to the yalinka. Technique for mixing different colors paper mills called kirigami. It is important for special beginners and that is optimally suited for preschool children, students of the pochatkovo school.
Materials from the master class: do-it-yourself kirigami technique reduction
- colorful paper with one white side;
- curly knives;
- bottle.
Pokrokovy master-class for little ones: how to make snowflakes with your own hands?

You can also make original cuts using classic schemes and templates. In the midst of proponing photos, you can pick up as simple as possible, so folded curly cuts:


How to make small cuts from paper with your own hands - pokrokov's scheme

Trivimirnі snizhinki vіdmіnno suitable for original embellishment at home. Before them, you can attach motuzochki and pinch at the door aisles, attach to the vicons. Vikoristati beautiful virobi Prepared with your own hands, you can also for moving up to the stele, to foam plinths under the stele. Prepare three-dimensional discounts for New river it’s clumsy with your own hands, but it’s necessary to take care of it, so that the stink of neatly gluing together all the details.
Do-it-yourself materials for the master class
- colored double-sided paper;
- PVA glue;
- scissors.
Meister-class with the preparation of bulk cuts with your own hands

Side cuts from paper - step by step we prepare great embellishments.

Even more beautiful cuts can be seen from white, and colored paper. Dodatkovo virib can be covered with sparse farboi or with blisks. The similar decor will help to build the true original and milieu. new embellishment. Below are various schemes and templates of cuts, which you can work with your own hands from the same type of blanks. Help the child prepare a rich variety of beautiful embellishments for the home.
Materials from the master class beautiful do-it-yourself snowflakes for children
- white paper;
- plate;
- protractor;
- scissors;
- olive.
Master-class of new decor: how to make a paper cut with your own hands


Unprecedented and beautiful snowflakes from templates - robimo yalinkovi decorate with your own hands

Wealthy little ones definitely want to make such a little drop, so that it will be even more beautiful and even more incredible. Similar embellishments are miraculously suitable for the original decor of the interior and childish rooms, halls, and bedrooms of fathers. It’s easy to make such small cuts with your own hands according to the photo, even if it’s more foldable, you need to carefully cut them. It is more convenient to vicorate for the preparation of new embellishments, special templates. Having spread them, you don’t have to worry that the little one won’t be able to beautifully transfer the little ones - you’ll already have images on the sheet.
Materials for the preparation of a snowflake with a spider from a cicada master class
- paper;
- thin sharp knives;
- olive.
Meister-class for the preparation of a puffball for Spiderman

Help with creating unusual cuts and such handy templates:


You can create original paper cuts with your own hands and with video prompts. In the midst of proponing master classes for children, add a lot of volume and flat embellishments of a non-standard look:
New do-it-yourself snizhinki with paper - pokrokovy master-class for children

Babies of 2-3 years old, as well as older children, want to help their mothers and tatovs in decorating the booth until the New Rock. That's why you can make your own original decor. And if a child could independently make a small cut or a garland, it is necessary to protect a sprat of simple rules:
- the little one is guilty of forgiveness and forgiveness of the minimum of other elements;
- fold the leaves more often with the fathers (they have grown up to help additionally in the smoothing of the tufts, otherwise the little ones can be severely destroyed);
- endure the breeze as needed with your mother or tatom: help the child get pardon from the robot;
- Virіzati details the little one is only guilty of hospitable scissors and rounded tips - the stench will not tear the balls of the leaf and at the same time it will be completely safe.
Under the pre-trial designation, the gum decoration could be made from the skin of the little ones. Apply the preparation of simple samples for children 2-3 years of age lower.
Materials for work with a master class
- paper;
- olive;
- scissors.
Step-by-step master-class: do-it-yourself new cuts from paper

Meister-class with new paper cuts with your own hands from photo and video

Stylish and beautiful snowflakes can be made no less figuratively looking at the leaves, and even victorious at the robotic set of quilling. Thin smugs are good for finishing a trivi- mer decor. The stench can be supplemented with rings for adding embellishment near the room, on Yalintsy. In order to work in a non-standard technique, you can add special sets of husbands or make them independently from a smart office paper. The wife's wife is due to the mother, the width is close to 1-3 div.
Do-it-yourself quilling materials
- paper smugs;
- PVA glue;
- cord (can be replaced with a stitch);
- hair cut like a handle (you can use an awl).
Pokrokovy master-class with photo - new do-it-yourself cuts from paper

How to make new paper cuts with your own hands?

For an hour to take at the cages and schools a lot of teachers and tutors to ask the little ones the task of preparing the cuts. The decor can be vikoristovuvati to decorate the bedroom, kіmnati іgor, music hall. But not all babies can see small details with bagatorasis folding of the sheet. For such experiences, it’s better to choose a scheme for a paper cut, as little ones can easily make it with their own hands.
Materials for preparing a volume discount from the master class for 15 quilin
- paper;
- scissors;
- PVA glue.
Pokrokovy master-class: how to make a new paper cut with your own hands

Similar simple embellishment can be done with a different design. About those, how to prepare the original one at the same time, incoherently, will tell the next video:
New do-it-yourself cuts - paper origami with report photos and videos.

Preparation of modular origami for the sake of respect, perseverance and patience. Folding elements allows you to take non-standard items. But such a decor is more suitable for grown-ups and young children: little ones cannot create a modular design. Below you will look at the rules for folding a new origami paper cut with your own hands with video prompts. Children can try the simplest option - the quilling technique. Pills from paper wives are easily picked up and glued together.
Do-it-yourself quilling materials for work with master class
- mating;
- PVA glue;
- hair cut like a handle (or a skewer).
Meister-class with the preparation of new paper cuts for children from paper with their own hands

Do-it-yourself snowflakes prepared are a wonderful option for stylishly decorating a booth, schooling that childish garden to the holy New Rock. Flat elements can be glued to windows, decorate doors and walls with them. The voluminous decor is wonderfully suitable for stylization of the place: through the surrounding details, you can slip the threads and move the elements to the stele, attach them to the yalinka. Children can prepare just ask behind proponovanimi templates and schemes. Ready solutions just get along, and then easily look at the paper. It is not enough just to create great laced cuts for watching videos with step by step looking at the cuts. Among the most popular options, you can know both classic decor and unique designs in the quilling technique, modular origami.
To embellish the yalinka and the booth, it is not obov'yazkovo to bathe the faceless toy and embellishment.
If you have colorful paper, cardboard, glue, and a sprinkling of additional simple materials, you can create a great number of new creations.
The axis is only a small part of paper's chances for the new rock:
What can be done with paper before New Rock: embellishment with straws
You need:
- 2 arches for cardboard of different colors or 2 arches for paper for scrapbooking
- Knives
- PVA glue
- tasma
- Kіltse z kіplennyam vіd lantsyuzhka (when bazhannі)
1. From one arch to the cardboard, cut 14 squares with a side of approximately 2.5 div.
2. From the other arch to the cardboard, cut 14 squares on the side close to 3 div.

3. Repair the protracted ends of the squares as shown in the image, one end over the other. At mistsi, de kіntsi they overlap one on one, add a little glue.


4. From the bottom of the arch to the cardboard, cut a circle with a diameter of 5 cm. Name the yoga center.
5. Apply glue to the ring and start gluing the prepared tubes - a bunch of large tubes, and then small ones - stinks are glued on top of the big tubes.

* Try to stick the tube to the tube.
* It is possible that you do not need to pick up all the prepared tubes, it is normal.


* As an additional embellishment, glue a sprat of rhinestone to the robe (not obov'yazkovo).
6. Add a tasma - її can be glued or put in a ring, attached to embellish.
Do-it-yourself new paper cones

You need:
- Colored paper or cardboard
- Line that olive
- Knives
- PVA glue or studs
- styrofoam bag
- tasma
* If you did not know the styrofoam bag, then you can replace the paper with a paper bag in the shape of the bag, wrapped with thread, as if to close the shape.
1. From paper or cardboard, fold the jacket of the zavtovshka 2.5 cm.

2. Cut the skin of the hutch crosswise on small pieces 2.5 cm wide - you have a sprat of squares.
3. Fold the leather square as shown in the image - make an arrow, bending the length of the ends.

4. Prepare the paper bag and begin to glue (or attach with pins) paper blanks to it as shown in the image. Hit the bottom row with balls, then collapse uphill, creating new rows.

5. Glue a tasma to the poppy, so that the yalinka can be hung on the yalinka, and you can also add some pieces of leaves to embellish.
New designs with paper in quilling style

You need:
— sides of old magazines and newspapers
- PVA glue
- Molds for vipіchki (per bag)
- a thread or a tasma that namistinka.
1. From the paper, swipe the swag with a width of 4-5 div.
2. Fold the skin around the dozhin. Lay out the husband and fold again, but this time the skin side to the center, and then I hit the husband again (divine image).
2. Prepare the glue and start twisting the knots to a keel, adding a little glue, so that the stench does not rise.


3. Take one more paper's wife and sign її like at point 2. Prepare a form for this butt won in the form of a zirka) and put in her paper's husband, neatly laying out in the middle of the form.
4. Now repair the laying out in the middle of the form of twisted paper mugs. Apply glue to them, so that the mugs will fit together with each other in the middle of the form.


4. If the glue is dry, pull the workpiece out of the mold. You can add more glue, so that the preparation becomes even more powerful.
5. Pull the thread or tasma through the wire and give us the namist. Tie a vuzol.
* For such a viroba, you can vikoristovuvat different forms, heart, for example.
Embellishment of a wall from a colored paper for a new river

You need:
- 10 paper plates
- 20 arcades of green paper
- stapler
- double sided tape
- Knives
- Decorate cardboard (you can paint on old leaflets or paint and paint)
- bila tasma (for the bazhannya).

1. From the green paper, make large squares - one square from one arch. The square is to be placed in the middle of the paper plate. As it is necessary, change your mind.
2. Fold the leather paper square with an accordion, and then navpil.
3. Close the kіntsі folded navpіl harmonica, schob otrimati pіvkolo.
4. Repeat steps 1-3 with a smaller paper.
5. Two pіvkol z'ednayte mіzh yourself behind the help of double-sided tape or a stapler, to make a kolo.
6. For the help of double-sided tape, attach a stake to the middle of the paper plate. Before salutary side glue the plates with double-sided tape or apply glue so that you can stick it to the wall or the other surface (you can stick it to plywood, a wooden tablet, cardboard and then put it on the police or hang it on the wall).
7. Make 10 such blanks.
8. Start working on embellishing the yalinki. Cut papery yalinkovі igrushki and glue them between you, making the colo. Zrobivshi kіlka kіl (3-4 pieces), їх can be glued to the plates, like yalinkovі igrushki.
* You can add a tasma to the dome of the yalinka, on which way you can hang on the wall of the yalinka.
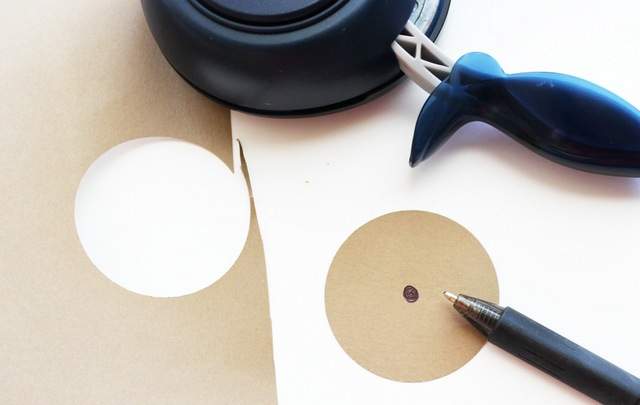
Newly embellish with paper: 3D paper dot

INI need:
- Cardboard
- colorful paper
- olive
- Knives
1. Paint a large dot on cardboard and swipe її.
2. Draw the pattern of drops to create a sprat - put a cardboard drop on paper, circle it.

3. Put a sprig of streaks into one stos, fold the stos navpil and fold the colo in the middle (divine image).
4. Start gluing the sides of the skin drop to remove one drop. This butt needed 16 specks to make one volume, but maybe more.
* You can add a thread or a tasma, so that I can add embellishment to the yalinka.

New toys from paper: paper bags from cones

You need:
- Papir (you can use old magazines)
- Knives
- thread and needle
- Double-sided tape or glue.
1. Divide from a paper stake of one diameter (choose the size, whatever)
2. To increase the diameter of the cut in dermal coli.

3. To make two cones from the skin mug - twist the papier from one of the other kintsya (under the cut) to the middle, and seal the workpiece with glue or tape (divine image).
4. Collect also two cones from skin circles, which are lost.

5. Prepare a thread with a needle and slip it through the skin blank so that the result of 10 blanks will have a bag. Tie a vuzol.

6. Add a thread or tasma to hang a toy on the yalinka.

How to grow paper new lighters

You need:
- clerical nizh
- olive that line
- bright colorful or decorative paper
- head and thread
- tasma

1. Prepare the arkush paper, fold the yogo navpil and cut it into two rectangles.
2. Put a straight cutter on a flat surface, you can cut it on a yakіy. For the help of a clerical knife, make a sprat of transverse incisions from one end of paper to another - the gap between the incisions is the same, and from the edges of the stench it can be about 1.5-2 cm.


* It is possible that you will need a little more time to tell you where you will be. Vicorist olive and line.
3. Roll the paper into a tube as shown in the picture. Close the ends with adhesive tape.
4. Take a needle with a thread and stretch it over the neck over and under the women, which they made up after the tears.
5. If you burnt the entire workpiece with a thread, tighten it and tie the knot.

6. At the upper part of the lіkhtarik from the opposite sides, open two openings and stretch a line through them, so that the lіkhtarik can be hung up.

Do-it-yourself novelty toys with paper: a colorful garland

Would you like to spend new holy more fun and brighter? To know a little time in order to build up new ideas from cardboard at once with relatives and loved ones! This guarantees you a garnet of spending an hour and the ability to decorate your booth in an original way.
For whom you need more patience and a little bit of your imagination. Let's paint a green yalinka for the head.
To create such a virib, to need:
- 1 arch of red cardboard (A4 format);
- scissors;
- glue "Moment";
- thin drill;
- pliers;
- olive;
- bliskitki;
- hairspray.
We create the shape of a star in front of us. For this armchair with a stylish side, the cardboard has two squares of the same size. Let's sweat them carefully. To fold the first part of the zirka, we take one square and begin to fold it diagonally into the edges of the sides. On the folds, near the skin center of the sides, there are cuts that do not reach the center of the square itself (1.5 - 2 cm).
Now the bіchnі kuti kotіrоkh storіn folded nazustrіch one to one schоdo in the middle of these sides (maє vyyti zіrochka z chotirma trikutnikami). Those same robimo with another square.
In order to give a circle of volume, then smear glue on one side of the leather tricot and stick it to the outside. Father, two parts yalinkovy embellish ready! Let's deal with the basis of the future star. For the new one, it is necessary to take an olive and a drіt.
Drіt it is necessary to wind the spiral around the length of a long olive (enough half). Zayviy drіt, which is overwhelmed, tasted with pliers (ale, with it, 5 cm of untwisted dozhini are overwhelmed).
If the base is crushed, it is necessary to roztashuvat with the non-twisted side in the center of one of the halves of the future star so that the spiral looks from below. You have seen a star on "lower". Then the insults of the blanks are glued together, giving the bulk of the fiber. Need to decorate Yalink's toy. And you can save money for additional bliskіtok and hairspray.
Zirochka brightly sips with sparkles from both sides and is covered with hairspray, it is necessary to give them sparkles. From i all! It’s not so easy to work the newcomers to embellish, as they will delight your eye with the stretching of the newborn saints!
Snowman from cardboard boxes
Another no less effective version of the designs - innovative embellishment from cardboard boxes! I wondered, what can be done from old boxes of z-pіd vzuttya? And you can make a whole chimeric snowman, which will become a miraculous addition to a new yalinka! Help you with whom, obviously, the Christmas spirit and the trio of perseverance.
You will also need the following materials:
- glue;
- 3 square boxes of different roses (white color);
- stencil;
- cotton wool or sintepuh;
- piece of fabric (orange color);
- knives, needle and thread;
- hat, gudziki and scarf (for decorating a snowman);
- farbi (acrylic);
- penzlik.
The boxes need to be picked up so that the lower boulder is the largest and the skin is stepped on the smaller one in front. If the selection of boxes did not bother them, they would be embellished. For an additional stencil, you can paint small cuts in the lower parts of the boxes from the skin side, or be some other visor, depending on what kind of stencil you have.
The stencil is not important to work independently. For which it is necessary to paint on the cardboard some kind of visor and draw it in the middle of the contour. Apply to the side of the box and turn the middle of the prepared stencil. Vizerunki paint farboi.
 If the farba has dried up, we glue the boxes according to the principle, which was discussed earlier. Now the hour has come to embellish the base of our snowman with Gudzikami. You can take gudziki different forms(Square, round, tricot), smutty, so the stench was of the same size. Glue two gudziki vzdovzh i in the center of the skin box, except for the one that mimics the head.
To make the head attribute of a snowman - nіs, it is necessary to wirl zі zі shmatka fabric of the collar, fill it with cotton wool or synthetic fluff and curl up at the looking tube. Then we only need to carefully sew the edges and glue the carrot to the lower part of the upper box.
There are small eyes above the nose. You can give a blush to the cheeks of a snowman. Rosefarb it for which light erysipelas color. Now it’s left to embellish the coat, putting a scarf and a hat on the new one.
Yalinkova toy at the sight of Dida Moroz
Modern embellishment at the sight of Dida Frost may be very popular, even if wine is the main symbol of the New Rock! Having grown a lot of such toys, you can embellish not only the yalinka, but hang your house. There is nothing collapsible in the preparation of such prototypes.
For their creation, you need less than a troch an hour and such materials:
- scissors;
- olive;
- colored cardboard;
- round little buzzards;
- motuzka;
- glue.
We need to paint and see all the details, from which a toy can be put together. For whom robimo and virazaemo two great stakes of a different color, but of the same size. One rozrazaemo navpil and vіdkladaemo killed - the future hat. In the future, when there will be disguises, to which gudziks are glued at the sight of the eyes and nose.
The beard of Dida Frost to fight like this. On the cardboard of a white color, the same small stakes are seen, then they are glued one on one in rows (like a luska), creating a beard likeness with it.
If so, it’s necessary to get a baby’s hat. For whom we take half of the previously deposited stake and glue it so that it curls half of the stake of the individual. The visor of the cap veils with a woman (0.5 cm) and sticks to the line, de-ending the cap. Now it is no longer enough to glue the eyes and nose, and attach a skein to the stylish side, on which our embellishment will be trimmed.
In front of the dovgoochіkuvane holy - Novy rіk, chekayuchi that everyone is dreaming about receiving changes in life!
Newly embellish, refine in fun company with the soul of that love, help you to spend old river and tell the future!